How to Dehydrate Oranges Like a Pro 🍊

Zesty Adventures Start in Your Kitchen
Ever tried dehydrating oranges and ended up with chewy, sticky slices that didn’t look anything like Pinterest promised? You’re not alone. But good news: making perfectly crisp, flavorful orange slices is easier than you think—especially with the right tools and tips.
Whether you want to create healthy travel snacks, DIY decorations, or citrusy cocktail garnishes, dehydrated oranges are a joyful staple for every adventurer’s kitchen. In this guide, you’ll learn exactly how to dehydrate oranges (with or without a dehydrator), plus creative ways to use them at home or on the road.
Ready to turn your orange slices into golden, sun-kissed treasures? Let’s dive in.
How to Dehydrate Oranges (Different Ways)
Dehydrating oranges is surprisingly fun once you know the tricks. Whether you’re sun-drying on a road trip or batch-making snacks at home, each method offers a different vibe. Below you’ll find the best ways to dehydrate oranges—with magical tips and tools that make the process even more joyful.
How to Dehydrate Oranges in the Oven
Don’t have a dehydrator? Your oven can totally do the job.
- Preheat your oven to 60–80°C (140–175°F).
- Slice oranges into ¼ inch rounds. Thinner = crispier.
- Gently pat them dry with paper towels.
- Place slices on a cooling rack over a baking tray to allow airflow.
- Bake for 3–4 hours, flipping halfway through.
- Let them cool—they’ll crisp up as they rest.
✨ Magical Trick: Wedge a wooden spoon in the oven door. This allows moisture to escape and keeps your slices vibrant and crisp.
🧡 Recommended tool: Use a stainless steel cooling rack to get that even, golden finish without flipping panic.
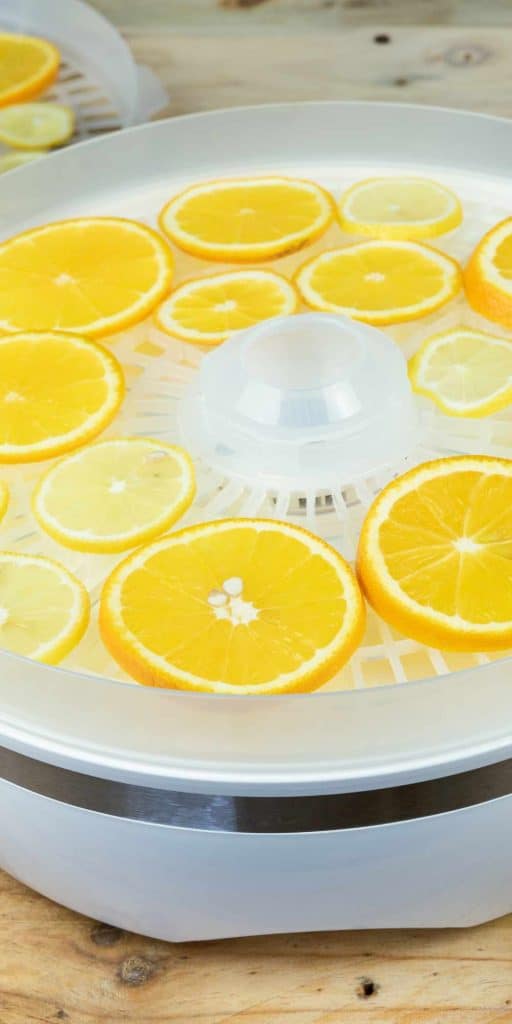
How to Dehydrate Oranges in a Dehydrator
The ultimate hands-off method. Set it, forget it, and enjoy perfect slices every time.
- Slice oranges into uniform ¼ inch rounds.
- Pat dry with a paper towel to speed up the process.
- Lay slices flat on dehydrator trays, no overlap.
- Set to 57°C / 135°F.
- Dehydrate for 8–12 hours.
✨ Magical Trick: Rotate the trays halfway through. This creates evenly dried, magazine-worthy slices.
🧡 Top pick: The Excalibur 9-Tray Food Dehydrator is amazing for big batches, travel prepping, and even citrus decor projects.
How to Dehydrate Oranges in an Air Fryer
Short on time? This method is fast and fun—but needs some attention.
- Preheat air fryer to 60–70°C (140–160°F).
- Slice and pat oranges dry.
- Lay in a single layer on parchment paper or a silicone mat.
- Dehydrate for 2–3 hours, flipping every 30 minutes.
✨ Magical Trick: Place a small rack or mesh screen on top of the slices. It keeps them flat and prevents them from curling or flying around.
🧡 Helpful tool: A reusable silicone air fryer liner makes cleanup easy and protects your orange slices.
How to Dehydrate Oranges in the Sun
For those who love slow-living and off-grid vibes.
- Slice oranges thin and pat dry.
- Lay them on a mesh drying rack or screen.
- Cover with food-safe mesh to protect from bugs.
- Leave in direct sunlight for 2–3 days, flipping daily.
- Bring them indoors at night to avoid moisture.
- Finish it off in the oven if necessary.
✨ Magical Trick: Brush a little lemon juice on each slice before drying. It preserves color and enhances flavor naturally.
🧡 Outdoor must-have: A stackable mesh food drying rack works great for sun-drying fruits on the road or at campgrounds.
How to Dehydrate Oranges in the Microwave
Need something fast and functional? This is your go-to fix.
- Slice oranges as thin as possible.
- Pat dry, then sandwich between two sheets of parchment paper on a microwave-safe plate.
- Microwave at 50% power in 30-second intervals, flipping each time.
- Continue for 4–6 minutes total, until they look mostly dry.
✨ Magical Trick: Let slices cool for 10 minutes. They firm up and get delightfully crisp during this resting phase.
🧡 Best helper: A set of microwave-safe parchment paper sheets makes this method smooth and mess-free.
Orange Dehydration Recipes (Add Spices Before Drying!)

Want to take your dehydrated oranges to the next level? Add a sprinkle of spice or sweetness before drying! These simple pre-dehydration recipes transform your citrus slices into gourmet snacks, festive decor, or cozy tea-time toppers.
Below are a few easy, delicious ideas to try:
🍯 Cinnamon Sugar Orange Slices
Perfect for cozy fall or holiday vibes.
- Mix 1 tsp cinnamon with 1 tbsp coconut sugar or brown sugar.
- Lightly coat both sides of the orange slices.
- Dehydrate using any method—your kitchen will smell amazing.
🧡 Pro tip: Use a bold silicone pastry brush for even application without making slices too wet.
🌶️ Spicy Citrus Kick
Great for adventurous snackers or cocktail garnishes.
- Mix a pinch of chili powder with smoked paprika and a touch of sea salt.
- Lightly dust onto orange slices for a tangy, spicy treat.
- Let dry fully—pairs beautifully with margaritas or mezcal cocktails.
🌸 Vanilla & Rose Infused Slices
Delicate, floral, and perfect for tea or bath rituals.
- Add a drop of natural vanilla extract and sprinkle with dried culinary rose petals.
- Press gently onto the slice to help them stick.
- Dehydrate slowly at low temp for best aroma.
🧡 Optional: Use bold edible-grade dried rose petals for a gorgeous finish.
🍫 Cocoa Citrus Cravings
A dreamy blend for dessert lovers.
- Mix raw cacao powder with a pinch of cinnamon and maple sugar.
- Dust lightly on slices before dehydrating.
- Use as toppings for yogurt, granola, or energy bites.
🍋 Zesty Lemon Sugar Upgrade
Layer the citrus flavors for double the brightness.
- Grate fresh lemon zest and mix with a bit of fine cane sugar.
- Sprinkle over the slices and press gently.
- Dehydrate and enjoy a tangy-sweet burst of sunshine.
These recipes don’t just add flavor—they create mood, memory, and magic. And because they’re made with whole ingredients, they’re a healthy indulgence that feels fancy without the fuss.
Next up: Let’s explore all the delicious and creative things to dehydrate (besides oranges!) that make travel and snacking way more fun.
Things to Dehydrate (Besides Oranges!)

Once you start dehydrating, it’s hard to stop. It’s like discovering a new superpower—suddenly, your fruit bowl becomes a snack station, your garden herbs become travel-ready teas, and your leftovers turn into backpacking gold.
Here are some of the most fun, delicious, and practical things to dehydrate—perfect for travel, camping, or just joyful living:
🍓 Fruits for On-the-Go Snacking
From sweet to tart, these fruits are perfect for hikes, road trips, or beach days.
- Strawberries
- Apples (try them with cinnamon!)
- Bananas
- Pineapple
- Mango
- Kiwi
- Blueberries (poke with a toothpick first for better drying)
🧡 Store them in a bold set of reusable silicone snack bags to keep things fresh and waste-free.
🥕 Veggies for Crunchy Chips or Soup Packs
Dehydrated veggies can be used for healthy snacks or rehydrated later for meals on the road.
- Sweet potatoes
- Zucchini
- Carrot slices
- Bell pepper strips
- Mushrooms
- Cherry tomatoes
- Kale (seasoned kale chips = magic)
🧡 Slice thin with a bold mandoline slicer for that ultra-satisfying chip crunch.
🌿 Herbs for Tea, Cooking & Camping Meals
Drying herbs is a great way to preserve flavor, especially if you’re traveling off-grid.
- Mint (great for tea or freshening your camper!)
- Basil
- Oregano
- Thyme
- Rosemary
- Sage
- Parsley
🧡 Keep your herbs organized in a bold mini glass jar spice set—great for vanlife or RV cooking!
🧄 Extras You’ll Love Having on Hand
A few more clever things to dehydrate that are surprisingly useful on the go:
- Citrus zest (store for flavor boosts)
- Onion or garlic slices (for homemade camping soup packs)
- Cooked rice or pasta (yes, you can rehydrate later!)
- Cooked lentils or beans
- Tomato paste or sauce (spread thin and dry into leathers)
🧡 Use bold dehydrator tray liners for wet items like pasta sauce or fruit purees.
Once you get the hang of it, you’ll start seeing ingredients differently—less waste, more flavor, and so many possibilities packed into lightweight, beautiful slices.
Now that you’re inspired, let’s talk about what tools and tips will make dehydrating feel effortless.
👉 Up next: Your must-have Dehydrating Essentials for the ultimate setup.
Dehydrating Essentials (Tools That Make It Easy!)
You don’t need a high-tech kitchen to start dehydrating—but having the right tools does make it easier, faster, and way more fun. Whether you’re drying oranges for the first time or planning full-on snack prep for your next road trip, these essentials will keep you prepared (and stress-free).
Here’s what you’ll want to have on hand:
🔌 Food Dehydrator
If you plan to dehydrate regularly, a dehydrator is totally worth it. It’s energy-efficient, mess-free, and lets you dry big batches at once without babysitting the process.
🧡 Top pick: The bold Excalibur 9-Tray Food Dehydrator is perfect for families, vanlifers, and food lovers who like to prep ahead.
🔪 Sharp Knife or Mandoline Slicer
Even, thin slices are key to consistent dehydration. A sharp knife works, but a mandoline makes it so much easier—especially for large batches.
🧡 Must-have: A bold adjustable mandoline slicer creates perfect ¼” slices in seconds.
🧺 Cooling Racks for Oven Drying
Using your oven? A cooling rack placed on a baking sheet gives you airflow underneath the slices—essential for crispy, even drying.
🧡 Try this: A bold stainless steel cooling rack set that fits perfectly into standard ovens.
🧼 Reusable Parchment or Silicone Liners
These are amazing for sticky fruits, fruit leathers, or anything with sugar and juice. They also make cleanup a breeze.
🧡 Recommended: A bold set of silicone dehydrator tray liners for mess-free drying and easy food removal.
🫙 Storage Containers
Once your goodies are dried, you want to keep them crisp and flavorful. Airtight containers are key—especially if you’re traveling or camping.
🧡 Best storage: A bold set of airtight glass jars or bold reusable silicone snack bags are both eco-friendly and space-saving.
🌡️ Oven Thermometer (Optional)
Many ovens run hotter than they say. A thermometer helps you keep the temp low and steady for better results when you’re drying without a dehydrator.
🧡 Optional tool: A bold digital oven thermometer keeps your citrus slices from browning too fast.
With just a few of these essentials, dehydrating becomes a smooth and satisfying ritual—one that saves money, reduces waste, and keeps your travel snacks feeling a little gourmet.
👉 Next up: Let’s wrap things up with a sweet and sunny outro (plus more fun posts to explore!).
Dehydrating Oranges Is Just the Beginning… 🍊
Now you know how to dehydrate oranges like a pro—crispy, colorful, and bursting with possibilities. Whether you’re snacking under the stars, styling a cake, or crafting a cozy citrus garland, these dried slices bring flavor and joy wherever you wander.
Feeling inspired? Keep the creative vibes flowing with more easy and delicious DIYs:
- Premade Camping Meals That Save Time & Taste Amazing
- Off Grid Living Made Simple, Wild & Wonderful
- Easy Skillet Breakfast Potatoes You’ll Crave Every Morning
Save this post so you can always come back to it—and pin it to your favorite board for future snack prep inspiration! ✨
Happy dehydrating and happy travels, friend!
